How to Check Wi-Fi Network Signal Strength in Windows 11

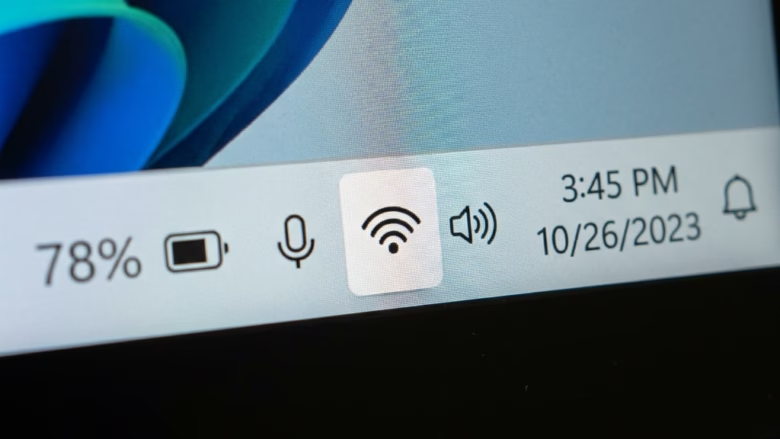
Wi-Fi signal strength in Windows 11 measures how well your computer connects to your wireless router using simple taskbar bars or precise measurements in dBm (decibel-milliwatts, a unit used to measure radio power). Strong signals give you fast and reliable web browsing, while readings at -70 dBm or lower mean you have a struggling connection that needs fixing.
Look at the Wi-Fi icon in your taskbar ’s bottom right corner for a visual bar indicator. Alternatively, press Win+A to open Quick Settings, click the arrow next to Wi-Fi , and see signal bars for available networks. For exact percentages, use the command prompt with “netsh wlan show interfaces”.
Option 1Taskbar Corner
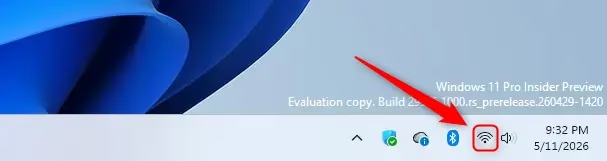
Look at the Wi-Fi icon in the bottom right corner of your screen. The number of bars shown tells you the signal strength. More bars mean a stronger connection.
Option 2Quick Settings
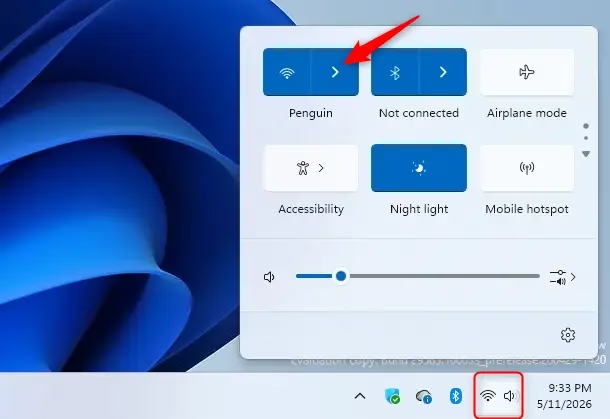
- Press Win+A to open Quick Settings.
- Click the arrow next to the Wi-Fi button.
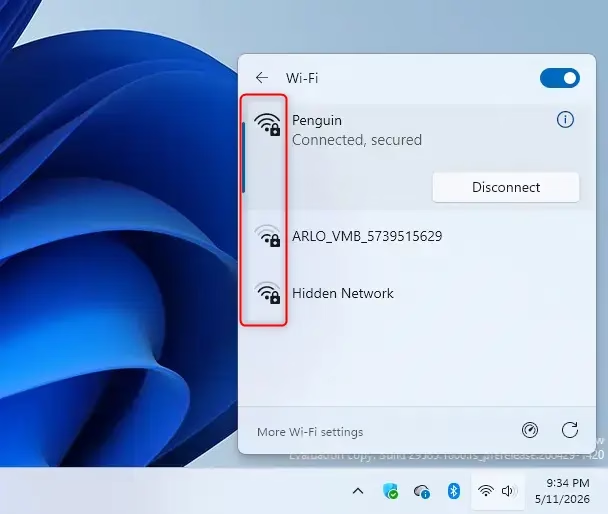
- You will see a list of networks with their current signal strength shown by bars.
Option 3Settings Menu
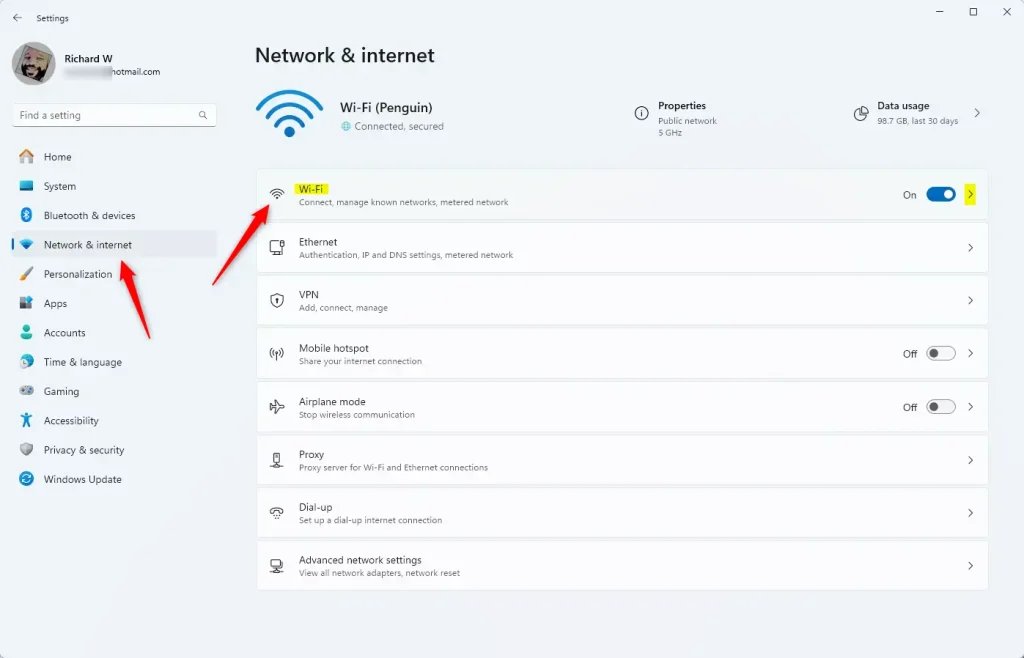
- Open Settings by pressing Win+I.
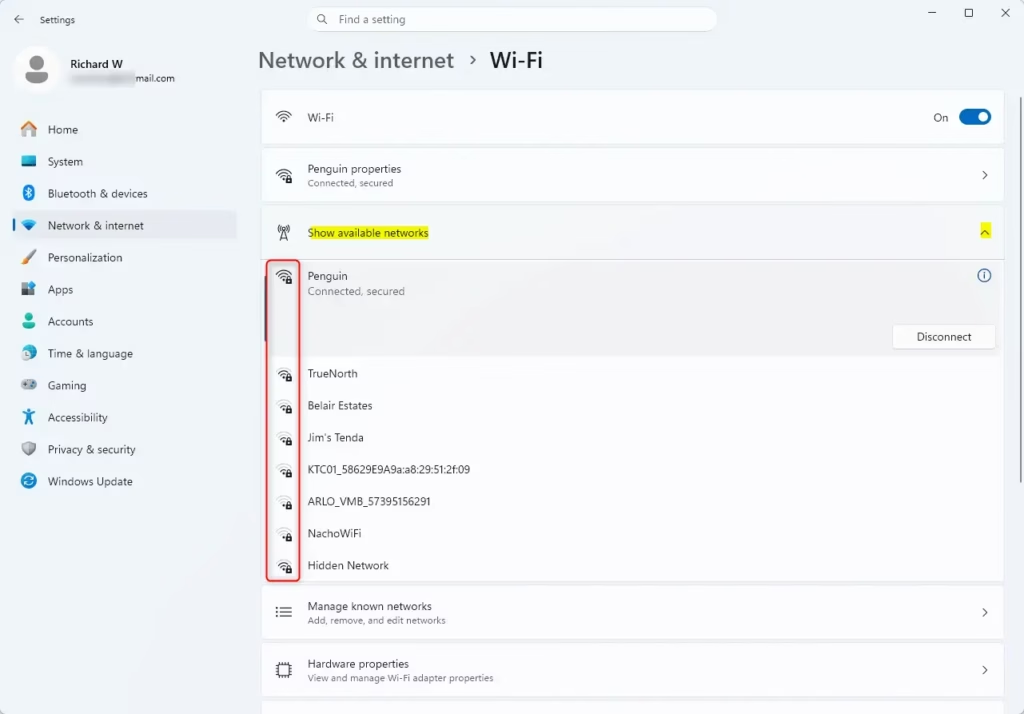
- Select Network & internet on the left, then click Wi-Fi on the right.
Here, the signal strength for your current connection is visible. Click Show available networks to see the strength of all nearby networks.
Option 4Task Manager
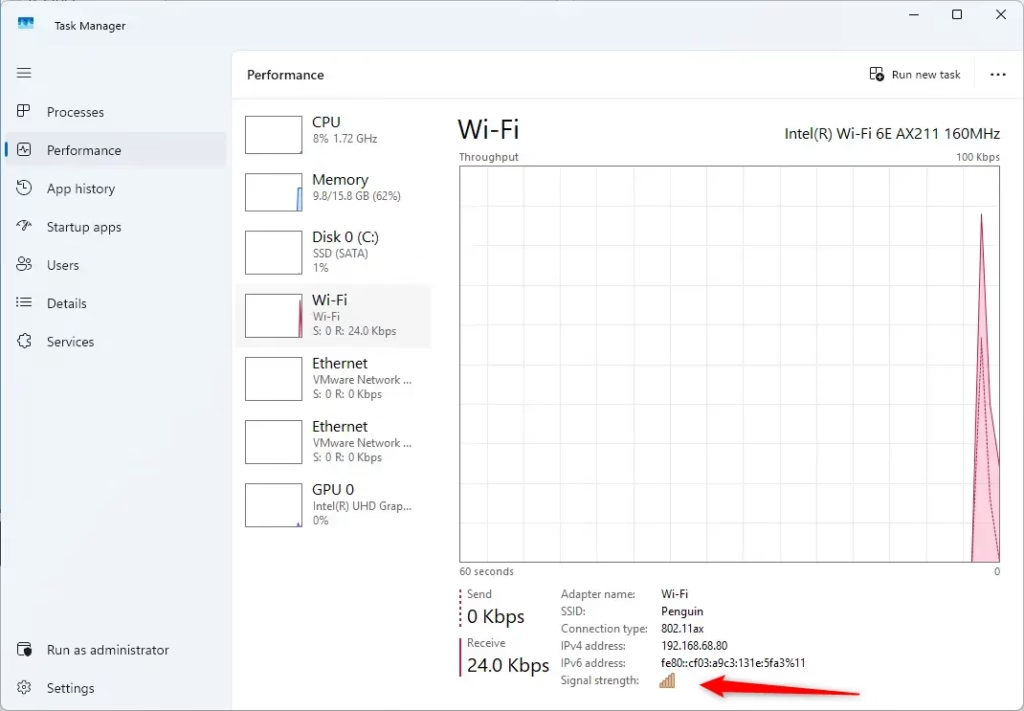
- Press Ctrl+Shift+Esc to open Task Manager .
- Click the Performance tab.
- Select Wi-Fi from the list on the left.
- The signal strength is displayed at the bottom of the window.
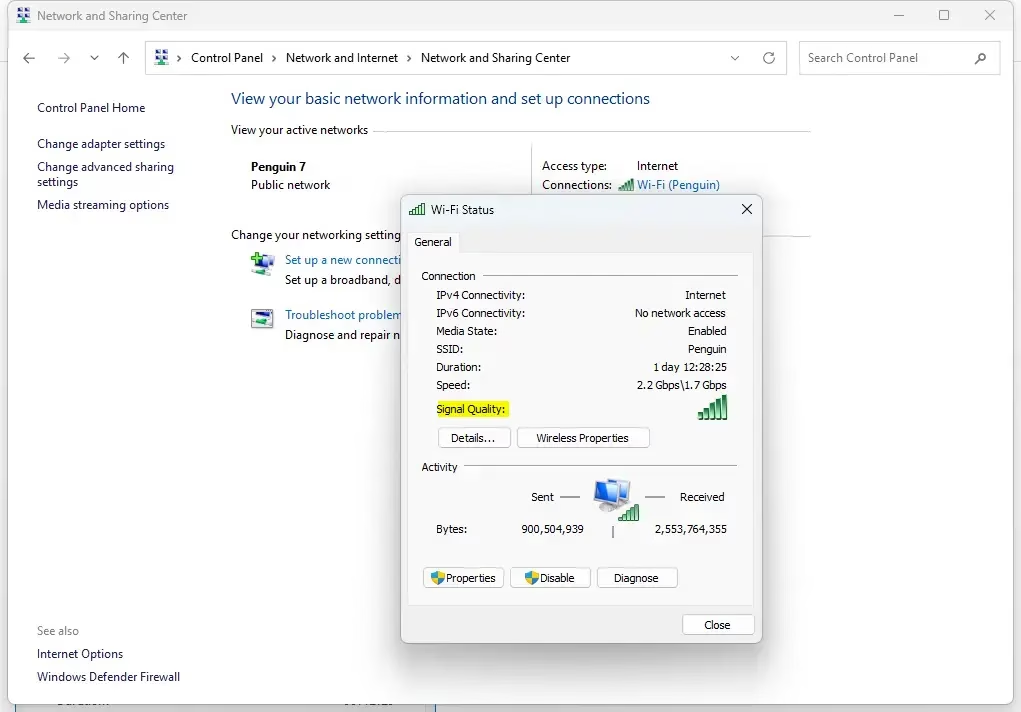
Option 5Network and Sharing Center
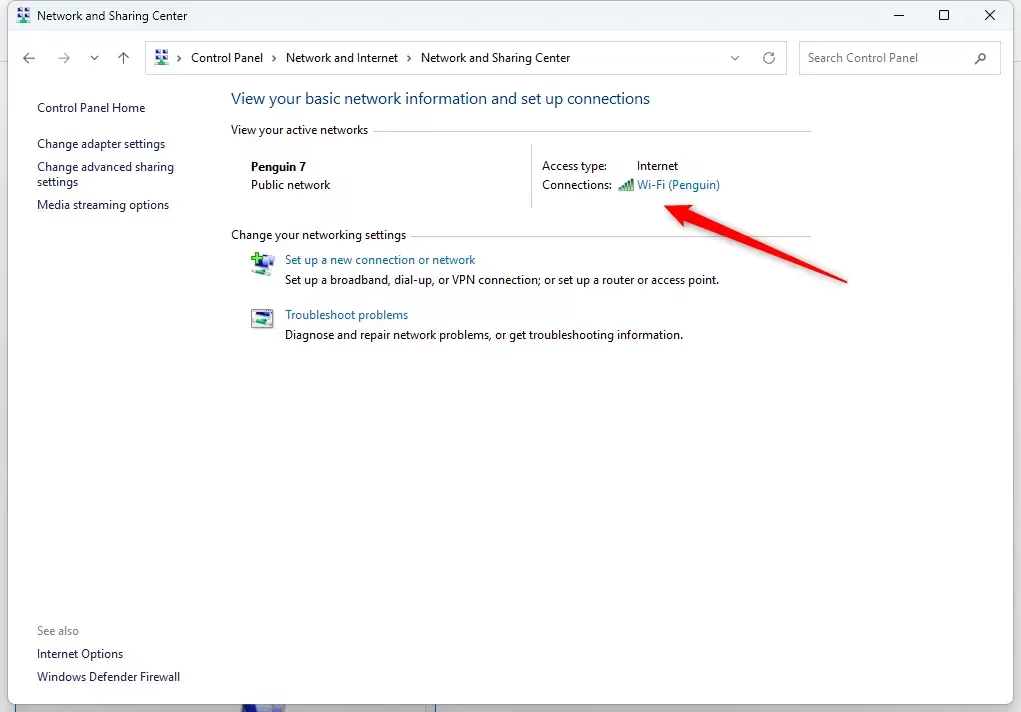
- Open the Control Panel and click Network and Sharing Center.
- Your current network name is listed next to Connections. The bars next to it indicate your signal strength.
- Click the network name to open a status window that shows signal quality.
Option 6Command Prompt
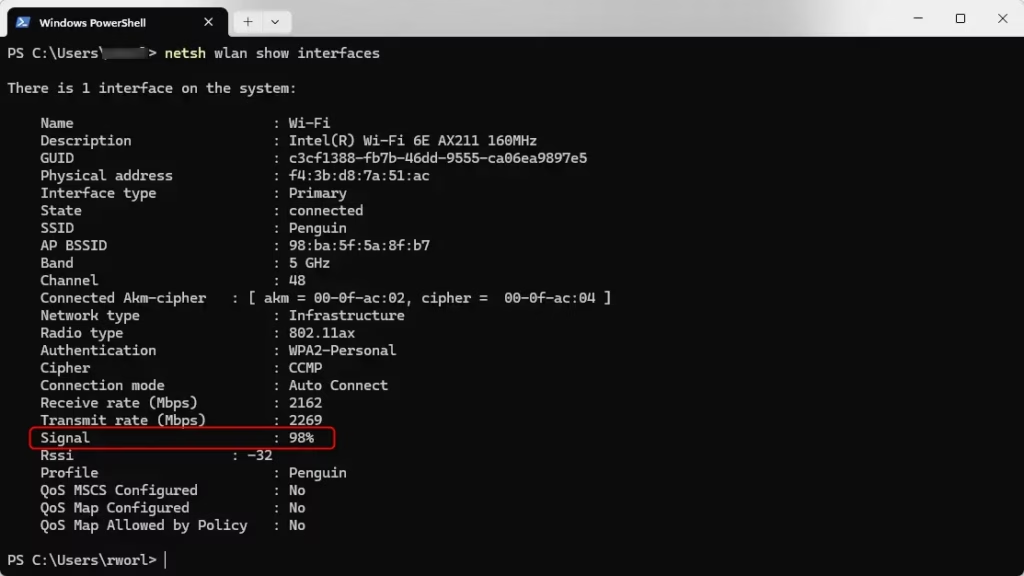
Command Prompt lets you check Wi-Fi strength with exact percentage numbers instead of relying on the rough bars in the taskbar . Running a quick built-in network command shows your precise signal quality right away so you can test if your connection is stable.
- Right-click the Start button and select Terminal or Command Prompt.
- Type the following command and press Enter:
netsh wlan show interfaces- Alternatively, for a simpler view, use:
- powershell
(netsh wlan show interfaces) -match '^\s+Signal' -replace '^\s+Signal\s+:\s+',''
Returned percentages reflect actual connection quality. Higher numbers indicate a more stable link to the access point.
Troubleshooting Poor Signal
Troubleshooting poor signal issues helps you fix a weak Wi-Fi connection that causes slow loading times and sudden drops. Simple physical changes like moving your computer, clearing away heavy metal objects, or switching between different frequency bands will make your internet much more stable.
- Move your computer closer to the router.
- Avoid placing the router behind large metal objects or inside cabinets.
- Switch between 2.4GHz and 5GHz bands. 2.4GHz travels through walls better, while 5GHz is faster but has a shorter range.
- Check for channel interference by using a Wi-Fi analyzer app.
Advanced Diagnostics
Advanced diagnostics in Windows 11 let you check Wi-Fi strength using detailed decibel measurements to track down hidden connection problems. These built-in tools give you a deeper look at your wireless network performance when basic taskbar icons and simple troubleshooting steps are not enough.
Summary: Monitoring wireless signal metrics provides a reliable starting point for diagnosing network drops. Taskbar indicators offer quick visual checks, whereas command-line tools supply granular dBm (decibel-milliwatts) data. Maintaining signal quality above -70 dBm ensures uninterrupted web browsing. Hardware adjustments and band switching should take priority before purchasing replacement networking hardware.
```Was this guide helpful?
100% of readers found this helpful (1 votes)

About the Author
Richard
Tech Writer, IT Professional
Richard is a writer at Geek Rewind who turns complex IT tasks into clear, step-by-step guides. He draws on years of hands-on experience in system administration and enterprise IT operations, focusing on Windows, Linux and WordPress: the problems people actually run into, and the fixes that work. His server and WordPress guides come from systems he runs himself. Richard builds and maintains the platform behind Geek Rewind, from its Ubuntu servers and Nginx configuration to its custom WordPress plugins. Many new tutorials start with readers' questions, and he's always glad to answer them in the comments.




No comments yet — be the first to share your thoughts!